
MacVideo is now integrated directly within Avenue to Learn. If you’re not sure what MacVideo is, view the overview here.
This integration allows you to easily:
- Embed videos directly from within Avenue to Learn
- Create videos directly from within Avenue to Learn
- Upload videos directly from within Avenue to Learn
You will only be able to upload content that you yourself own, or content where you’re added as a collaborator (co-editor and co-publisher) to someone else’s videos. It’s important to note that you cannot add media from channels. If you were added as a collaborator in a channel and intend to use that group of videos with the Avenue integration this will not work. The channel content will not appear for embedding and your account will need collaborator permissions for each of the videos.
If you’re unfamiliar with Avenue to Learn, or if you’ve never used it before, please visit these Avenue to Learn Wiki to learn more: https://wiki.mcmaster.ca/avenue/start
Avenue to Learn support is available from Monday to Friday, 8:30 AM to 4:30 PM. For the quickest response, please go to our support intake form, located at http://avenue.mcmaster.ca/support/ You can also reach us at (905) 525-9140 ext. 23757.
Whether you’re an instructor looking to create and upload video content or a student looking to submit an assignment that’s a video, you can now easily do this all within Avenue to Learn utilizing MacVideo. When logged into Avenue to Learn, anytime you use this integration it’s automatically tied to your MacVideo account as well. If you’ve never used MacVideo before, using this integration will automatically create a MacVideo account for you. You can then head over to www.macvideo.ca and log in with your Mac ID and administer, manage and edit your media.
If you’re looking on how to embed a video quiz to integrate into Avenue’s grade book, view this tutorial.
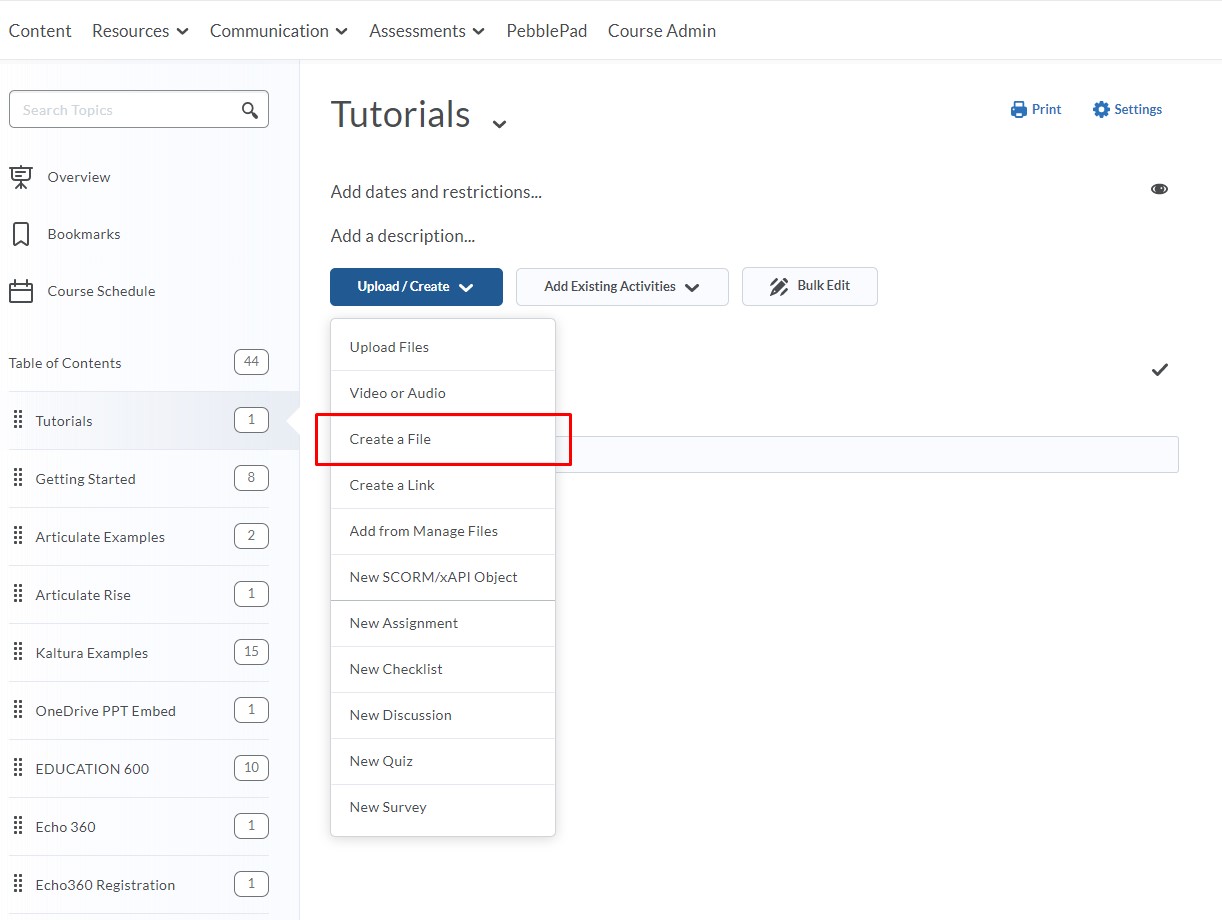
Anytime you are creating content on Avenue to Learn, Click on the Upload/Create button and then select Create a File.
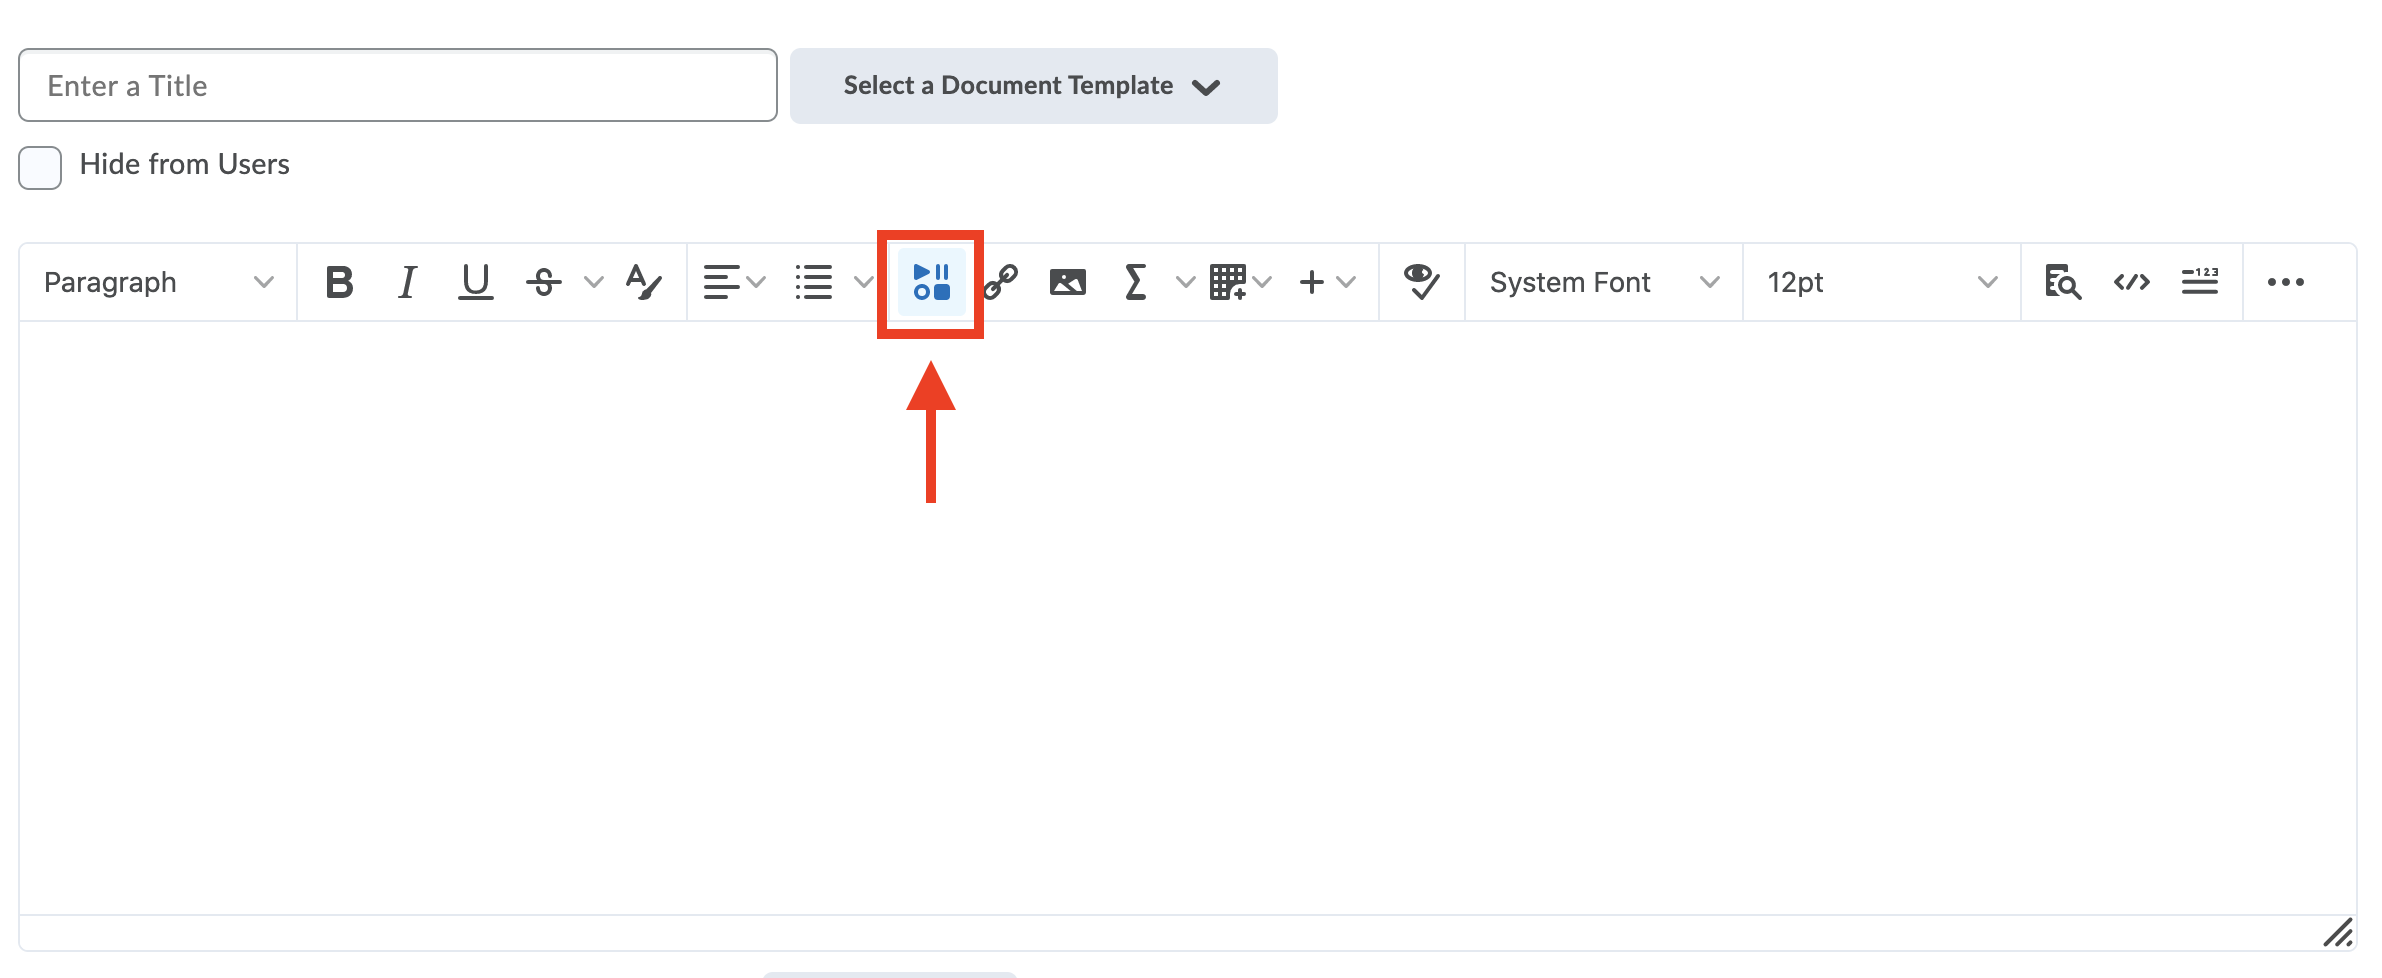
Next you will see the editor window on the Create a File page. Whenever you see this window within Avenue to Learn, you can access the MacVideo integration. From here select the Insert Stuff button. You will always be able to access the MacVideo integration when you have the Insert Stuff button available to you. This includes file or assignment submissions. Avenue’s editor has been recently upgraded. The new icon and location of the Insert Stuff button can be seen in the screenshot below.
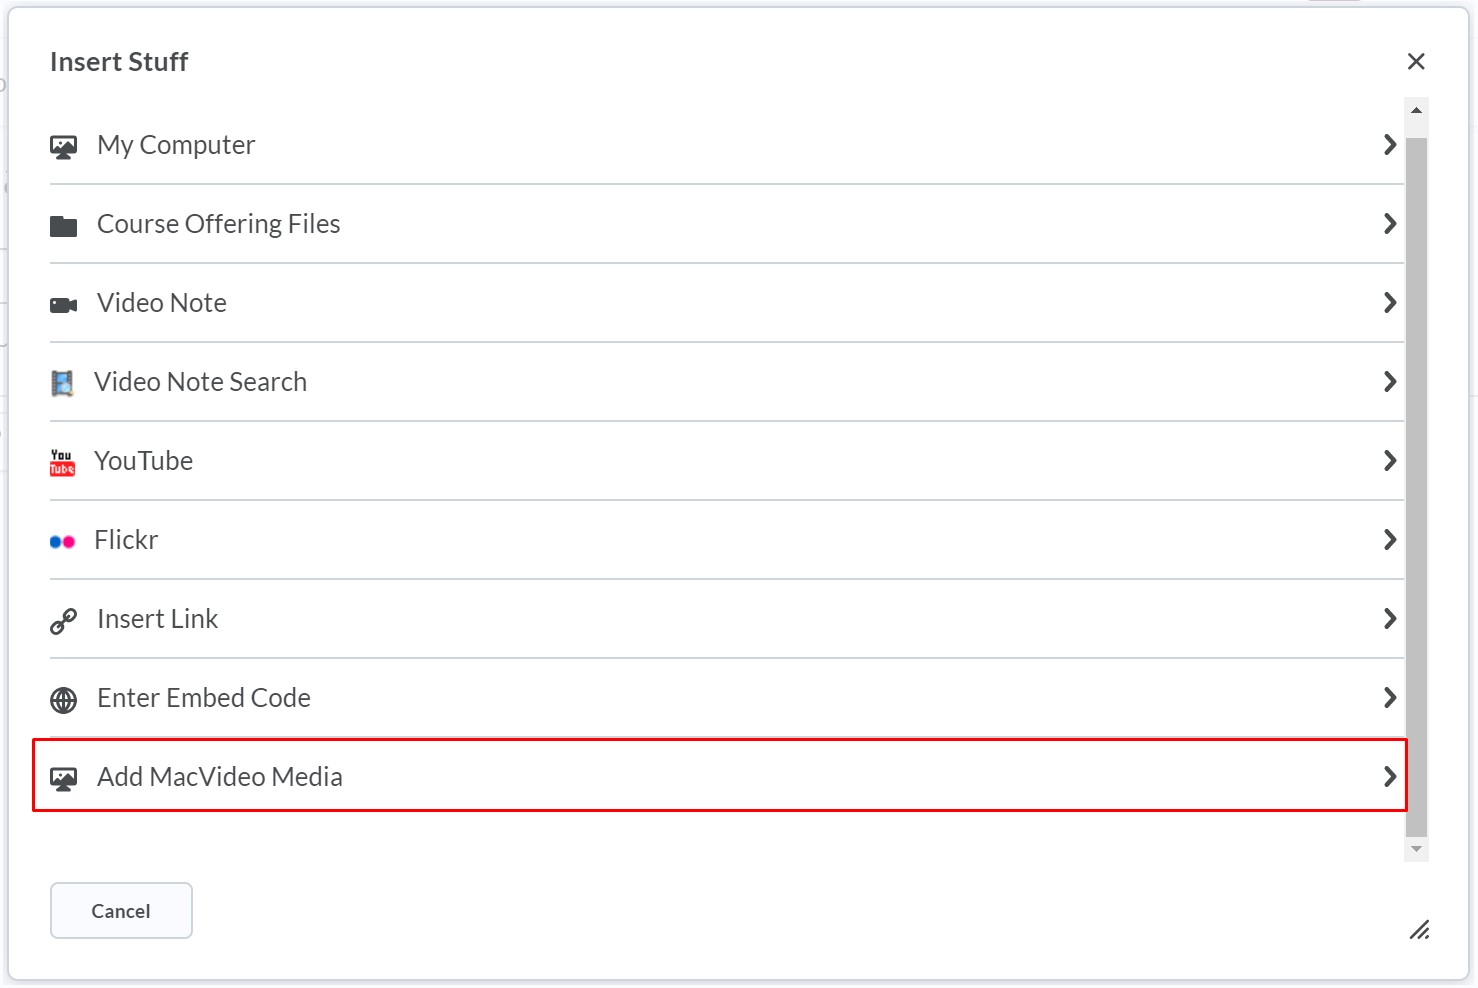
Once you’ve clicked on the Insert Stuff Icon, you will be able to see the “Add MacVideo Media” option appear. You may have to scroll to find it in the list of items.
If you don’t see this option, enable external learning tools in your Avenue course shell.
1) Click the Course Admin tab in the navbar.
2) Click Tools under the Administration section.
3) Go through the list and select the status of the appropriate tools to On/Off.
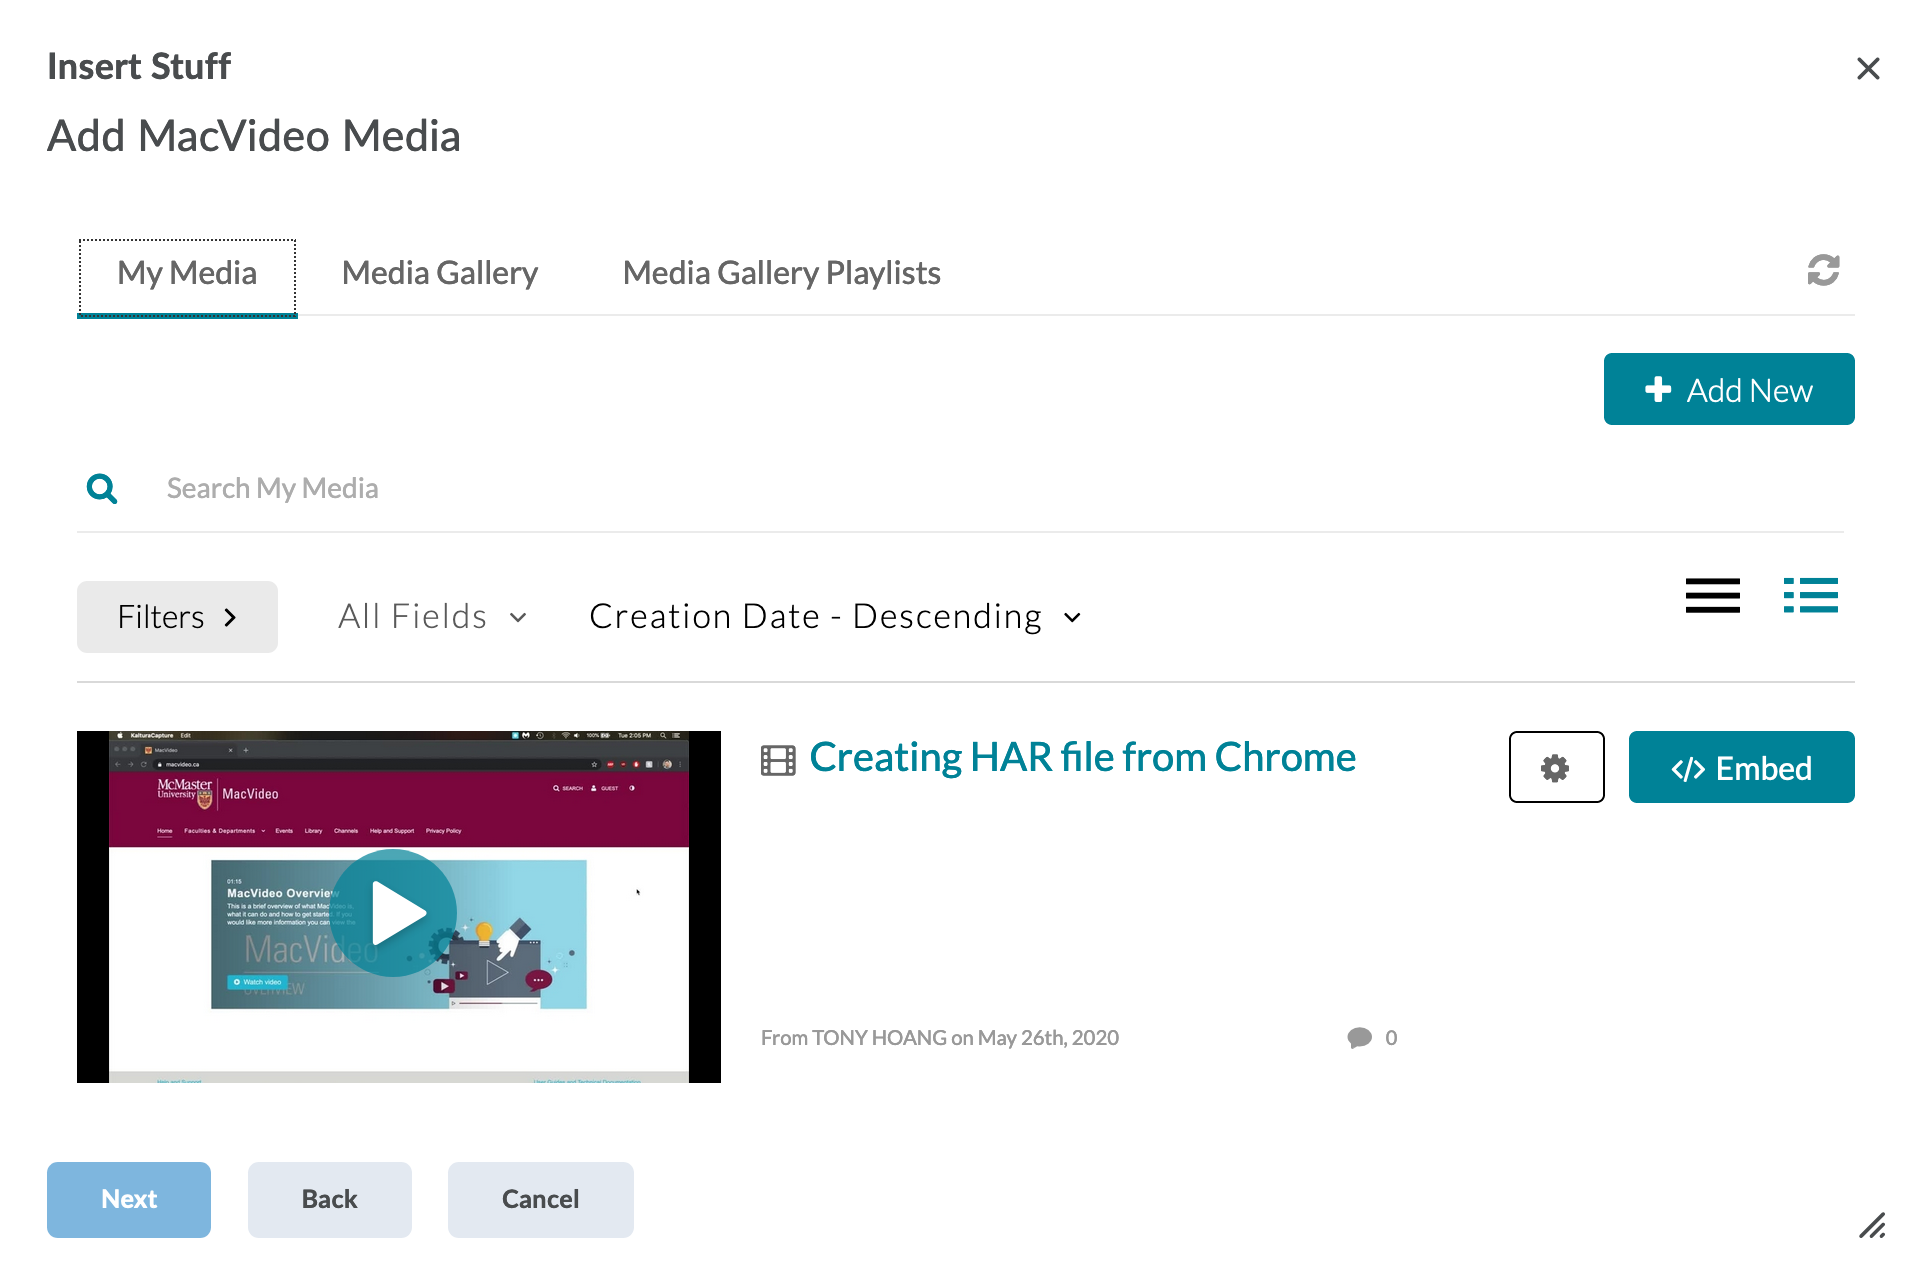
Once you’ve clicked Add MacVideo Media, your media that is attached to your MacVideo account will appear. From here you have the option to upload new media by clicking the “+Add New” button or select current existing media that you have. You also have an option to choose which player and what player size by selecting the gear icon next to the embed button.
 If you’d like to customize your embed settings, click the gear icon next to the Embed button.
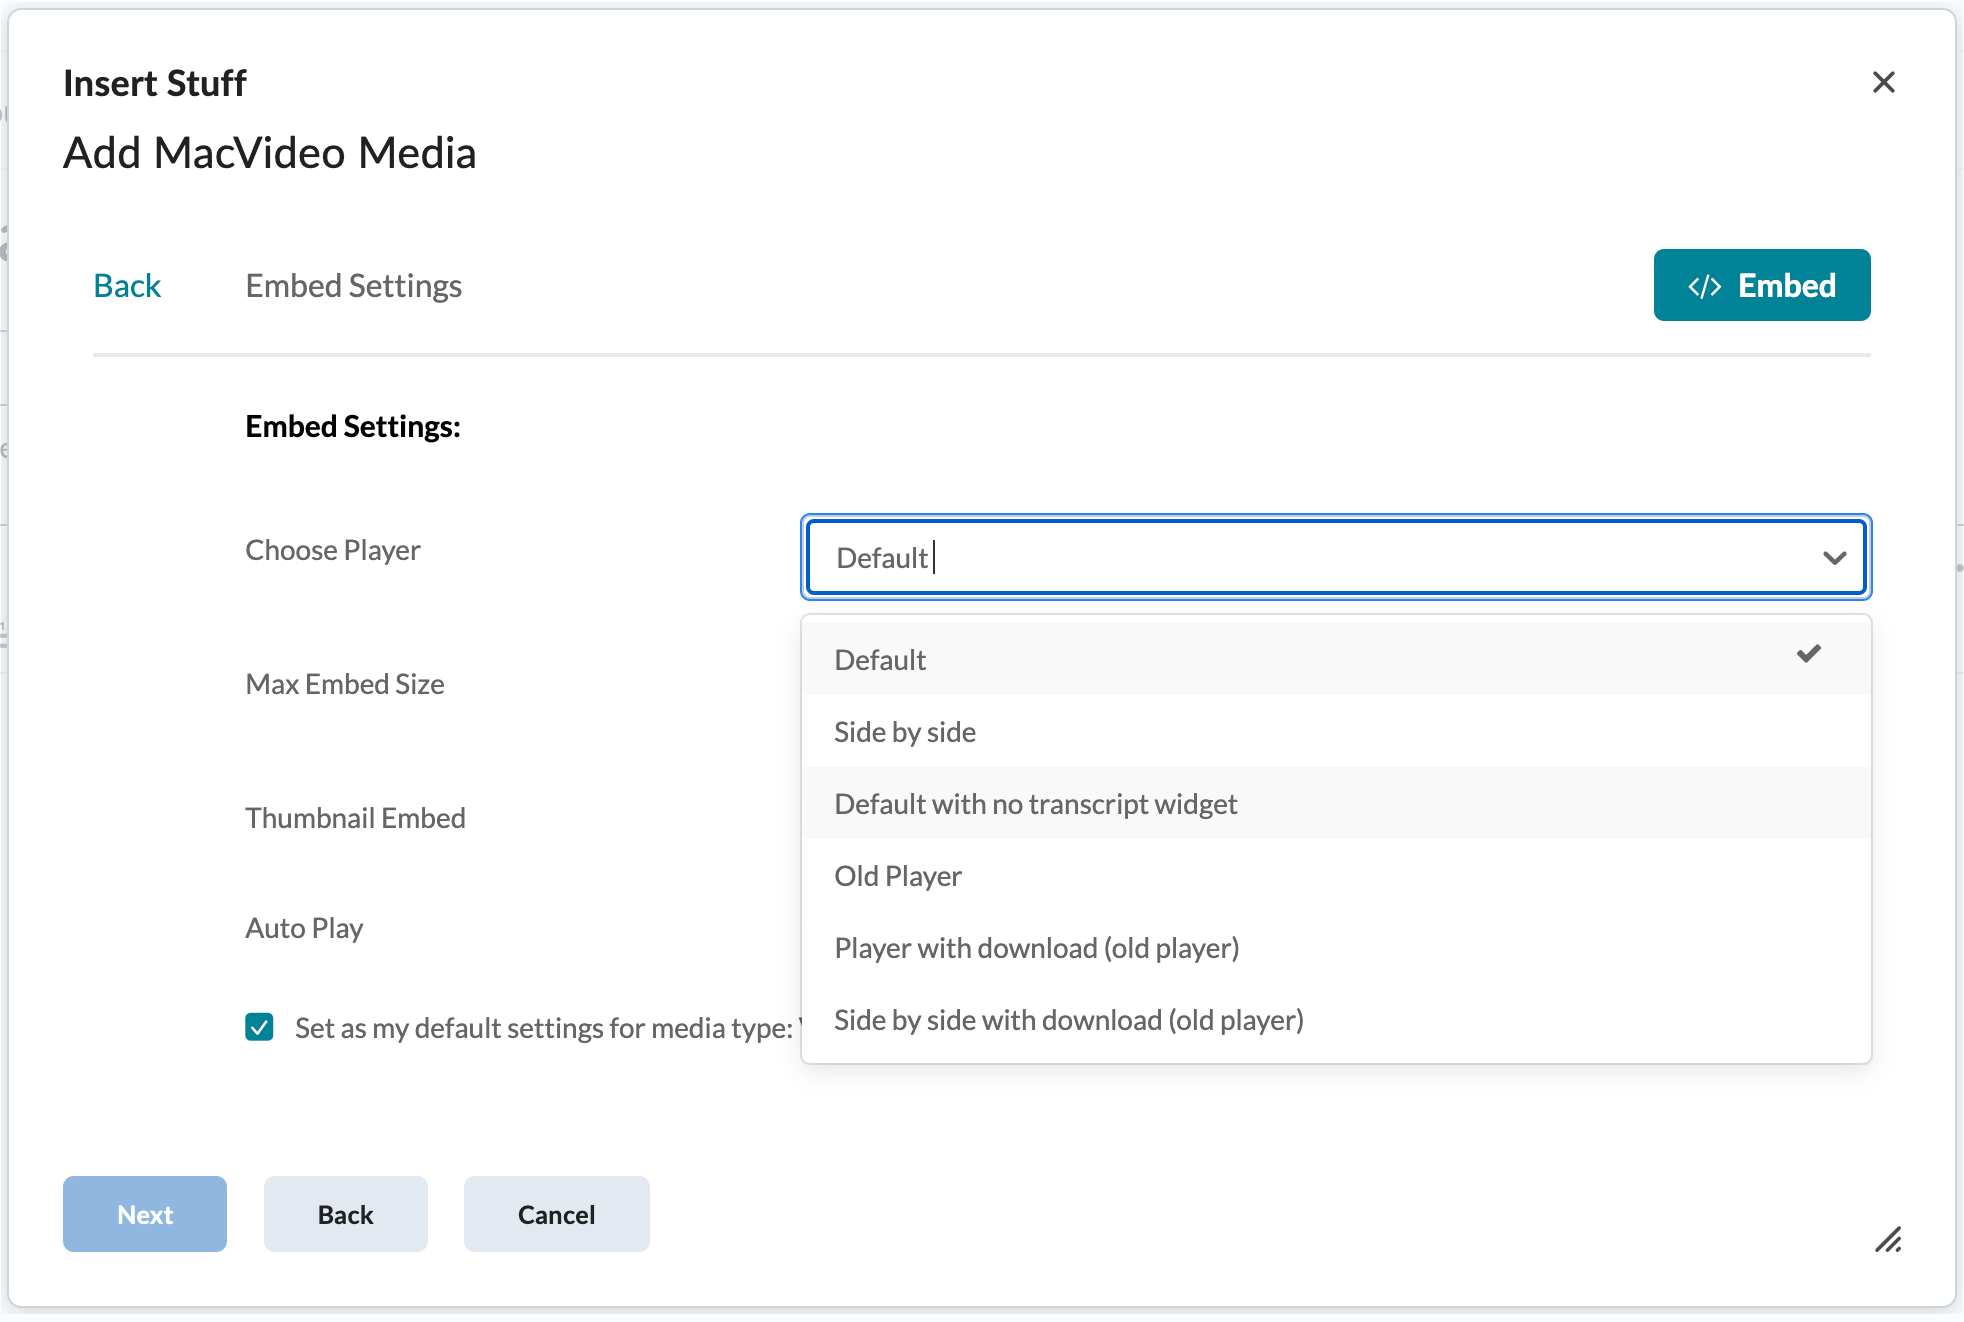 From here you can choose several customization options for your video.
- Choose player – You can choose which video player you’d like to use.
- Default + Side by Side players utilize the newest video player
- Default with no transcript widget is for those who wish remove the transcript widget from the player
- Old Players are the previous player options. You still have the option to use the old players if you choose to slowly migrate your embeds. To view the different video players go here.
- Max Embed Size – choose the size of the embedded video player
- Thumbnail Embed – When the page is loaded, a simple image file is previewed instead of the actual video player. This helps with load times for slower internet speeds.
- Autoplay – the video will play automatically as soon as the page loads.
- Set as my default settings for media type: Video – Have this option check marked if you want all these settings for every video embed. Now you only need to click the Embed button to have all these settings instead of manually changing them for each video embed.
After selecting the media you’d like to embed, you’ll see a preview of it. Once you’re ready click “Insert“.
Your MacVideo media will now be inserted.
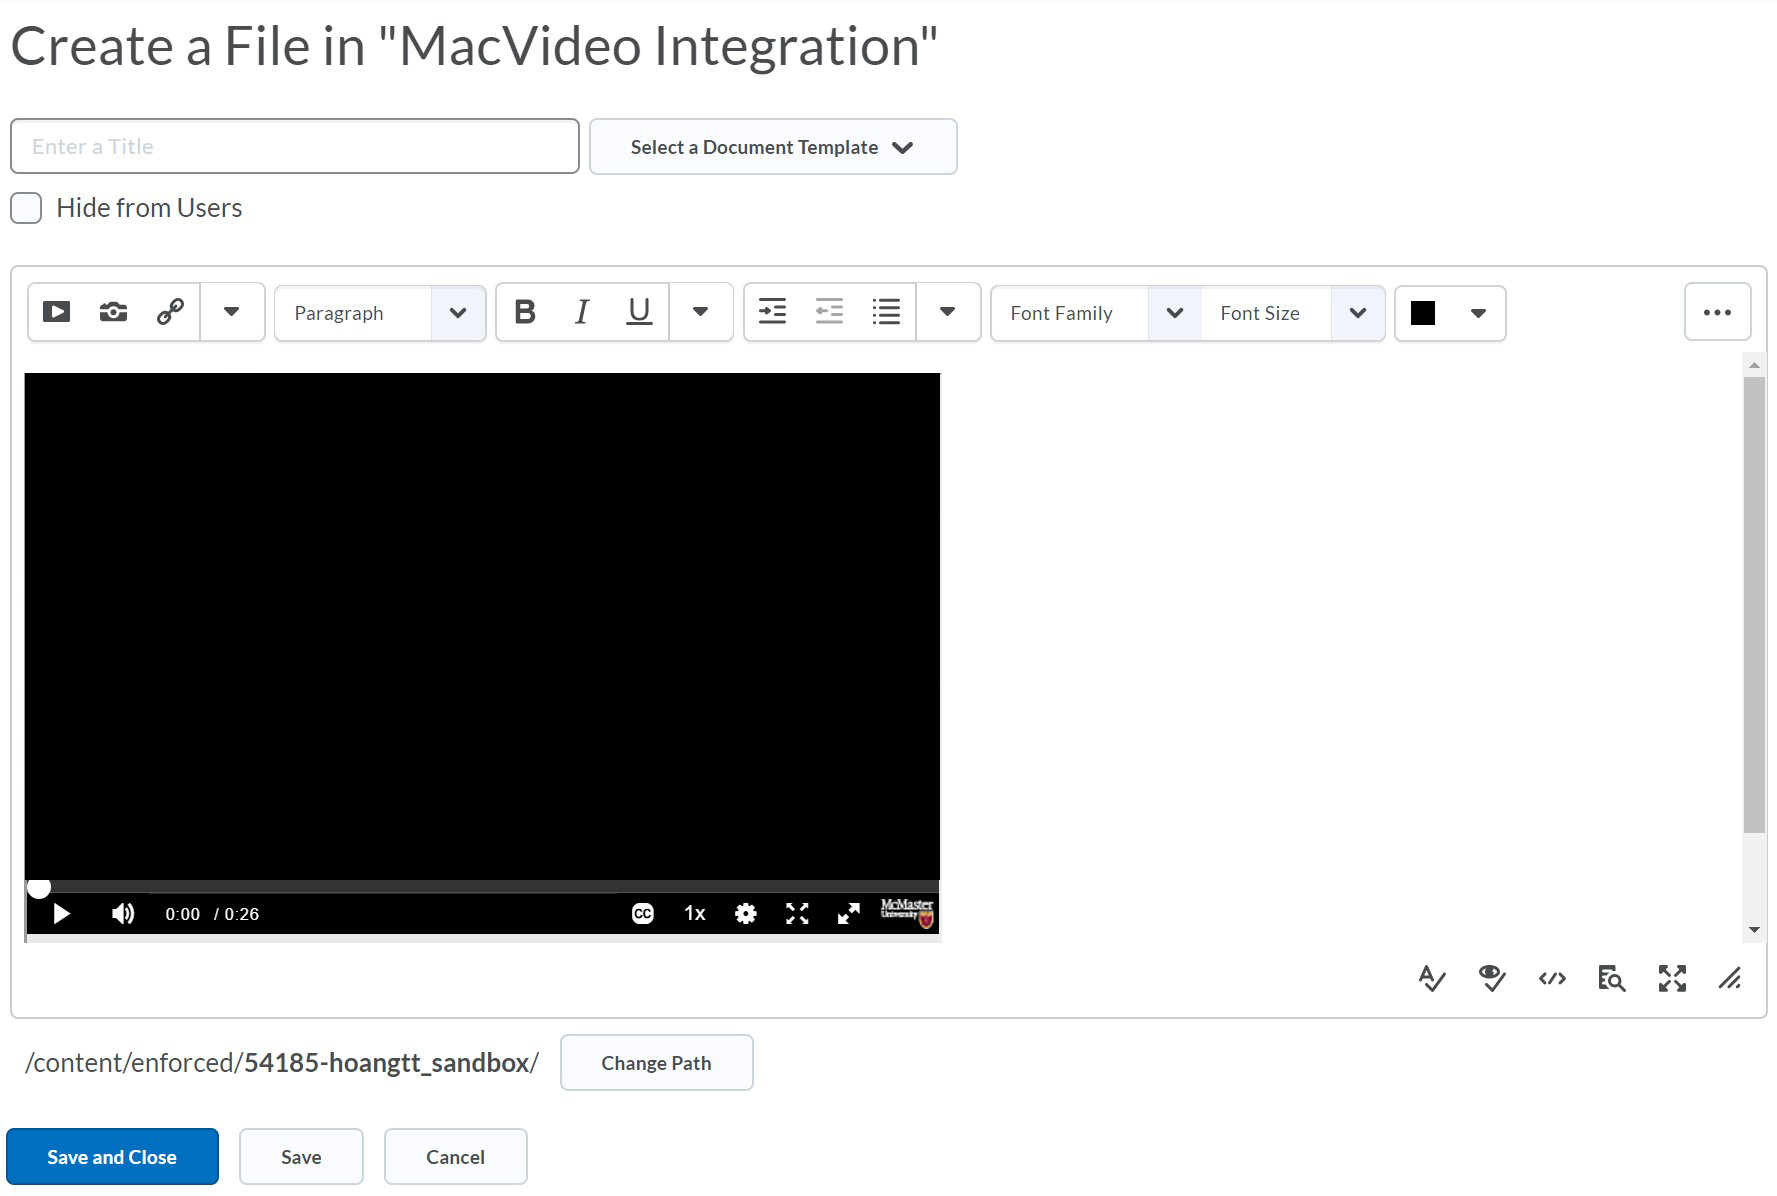
When you’re finished hit “Save and Close“.
You may notice that there is a small border around your video. Click here to see a work around on how to remove it.